 This is a Pumpkin Roll, if I call it a pumpkin roll nobody in my house will eat it, so we call it a spice roll. My husband doesn't even want me to call it a pumpkin roll, he says pumpkin roll just doesn't sound good. You know all that mushy orange stuff you pull out of a pumpkin when your a kid and your going to carve them. But mix it with sugar, cinnamon and a cream cheese filling and you have fabulous. My daughter asked me what I was making and then she looked at me and said "I
  want to know what it is really called", teenagers are so funny, NOT.Spice Roll
3 eggs1 cup of sugar2/3 cup of canned pumpkin1 teaspoon of baking powder1 teaspoon of baking soda1 teaspoon of cinnamon1/2 teaspoon of salt3/4 cup of flour1/2 cup of chopped pecansPre-heat the oven to 350 degrees. Beat the eggs andsugar until blended. Stir in the pumpkin, baking powder, soda, cinnamon, salt and flour. Spraya 15" x 10" cookie sheet with an
oil spray, cover it with a sheet of waxed paper, spray it again. Pour the batter into the pan and spread it out. Sprinkle the pecans on top and tap the pan to make the pecans dig into the batter. Bake for 15 minutes, remove the pan from the oven, flip the pan onto a cotton dish cloth, remove the wax paper and roll loosely, pecan side down, let cool.Filling8 ounces of soft cream cheese1 teaspoon of vanilla2 tablespoons of soft Parkay butter2 cups of powdered sugarBeat the cream cheese and butter together. Stir in the vanilla and powdered sugar. This should be slightly stiff, if not add more powdered sugarAfter the roll is cooled, slightly open and spread the filling onto the roll. Re-roll. Wrap in cling wrap and refrigerate for a few hours.
Take a skirt you all ready have and transform it into a fairy skirt. I took a black ribbon and tied strips of purple tulle onto it. I tied on a few black ribbons, made two silk flowers that clip on and a fairy wand. This skirt is worn over the black skirt but it is not attached so the black skirt can still be worn to school. The clips can be worn on the skirt, on her shirt or in her hair. The wand is just for fun.
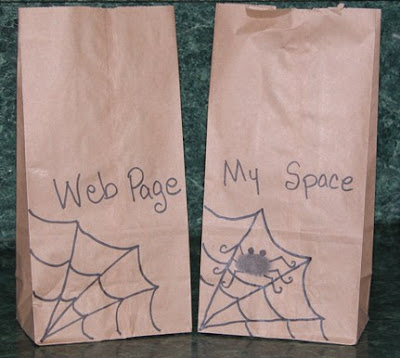 Have you ever forgotten your child's Halloween bag? Even though it's their bag, you forgot it and you will NEVER be forgiven. Well, I've done this a few times, so to help the mummy's out we have made BOO bags. We had these at the Church Festival and the kids love them, and we have fun making them. The first two bags use markers and an ink pad for a thumb print spider. The Trick or Treat bag is stamped with a circle sponge, let dry and color in the rest. the Crazy Cat uses scrap paper and google eyes. It's that easy and the bags are really cheap. You could draw a skull and call it Face Book. Pumpkins, Ghosts and Goblins,
  OH my.
 This is the easiest pie I have ever made and it tastes like Heaven. Heaven, this must be Heaven. This is a great recipe to let little hands help.Cookie Pie1 bag Chips Ahoy Original Chocolate Chip Cookies (not the soft ones)1 cup of milk in a bowl
 12 ounces of Cool WhipHershey's Chocolate SyrupDip each cookie into the milk and shake the excess milk off. Place one layer of cookies into a pie dish. You will have to break two or three cookies to fill in the layer. Cover with a layer of Cool Whip. Repeat two more times. Drizzle the chocolate syrup on top. That's it, now just refrigerate. *Make sure you shake the cookies or you will end up with milk puddles in your pie dish.*Just think of all of the cookies you can try with this recipe.
I saw this image on canvas and thought to myself that would make a cute t-shirt. You can see it at youcanmakethis.com. I used Tulip Slick paint that has a fine tip and it is just like writing with a pen. The large spider has sequins on the back and a black button head. The two holes in the button make it look like it has eyes..... spooky. This would be a good shirt to wear if your too old to "Trick or Treat", I myself think you are never too old to "Trick or Treat".
I needed some leaves to tie onto bags at our Harvest Festival so I searched on the computer and found some patterns at cathiefilian.blogspot.com. Her leaves are very pretty, she gives you two sizes of leaves and her leaves are made using material and stiffener. The kids at Church will be helping me so were using construction paper, wax paper and jute twine to make ours. I like the wax leaf the best, just take a large piece of wax paper and fold it over lengthwise. Open it up and on one side of the paper take fall colored crayons and with a pencil sharpener start peeling away at the crayons letting the peels drop across the wax paper. I used two shades of orange with a little brown thrown in. Fold the other side of the wax paper onto the crayon peels. With paper towels under the wax paper and on top take your iron that is set on medium heat and iron the wax paper until the crayons melt. The colors will seep through so make sure you have plenty of paper towels. Let the wax paper cool, trace and cut out the shapes. The dark brown large leaf really brought out the colors in the wax leaf. Punch two holes and tie a bow using jute twine. If these tags were for Thanksgiving I might use raffia to tie the bow and add a Thankful tag. I did use some scrapbook paper on these but the ones the kids will make will be from decorated construction paper and they will have a Scripture tag on them. 
 I found this recipe the other day but the site didn't have the amount on some of the ingredients so I Googled it. This is a fabulous cupcake, (my nephew called it Heaven) but I think it is more of a spice cupcake but then the kids wouldn't have tried it, so we will stick with:French Toast CupcakesPreheat oven to 350 degrees1/2 cup of soft Parkay butter2 eggs2 teaspoons of Maple syrup2 teaspoons of vanilla1/2 cup of milk1 cup of sugar1/2 teaspoon of cinnamon1 1/2 teaspoons of baking powder1 1/2 cup of flourMix all of the ingredients, fill cupcake pans about half ways and bake 18-20 minutes or until a toothpick comes out dry. I like to taste my batter and I was worried because this batter was awful but the cupcakes were great.Icing8 ounces of soft cream cheese4 tablespoons of soft Parkay butter3 cups of powdered sugar1 teaspoon of cinnamonBeat cream cheese and butter, stir in sugar and cinnamon. Frost generously.
These are my new wire pumpkins and they would look cute sitting on a counter or a desk. I used 20 gauge wire and a 4" piece of a branch that I cut from one of my trees. You will need 12-15 pieces of wire cut to 15" long. Criss-cross the ends about an inch and wrap it to form a circle. Hot glue the wire onto the stick, shape the wire to look like a pumpkin, cover the top stem with paper and spray paint the wire orange. Add a green ribbon and you have a pumpkin. 18 gauge wire would probably be best for this project but it is harder to work with because it is a thicker wire.
I made 10 of these door knob wreaths for the Church Christmas craft booth that will be in December. I saw one that was a styrofoam wreath, bells and ribbon, and I just happened to have these vine wreaths someone had given me (I don't remember who but I am Thankful). I tied the bells on with jute twine and cut some strips of material for the bows, but it was looking pretty plain so I added the black tulle. Now my idea of Christmas is everything should be sparkly and glittery and they didn't have any of that so I found some shiny red wired stars and bells that give it that special touch I was looking for. My house is a country Christmas so I prefer the plaid one but the red poinsettia ribbon looks more like Christmas. If I can find some 2" Crosses I would like to add that to them as a reminder of the reason for the season.
This lil old scarecrow wouldn't scare  anybody but he sure would be cute sitting on a desk. He has an 1 1/2" head and poly-pellets inside to give him some weight. I hot glued a flat disk onto the bottom of the rod and his head to the top, I also hot glued the bottom disk to the center of the 10" circle for his body, I didn't want any beads slipping under the disk and making him a tipsy scarecrow. I used a Sharpie for the eyes and mouth, a brad for his nose, a little raffia for hair, and I added a small burlap patch and button. I loosely hand stitched about 3/4" down from the top, all the way around the 10" circle and gathered it together. I slowly poured
  some poly-pellets into the sack (those darn things just fly all over the place), I knotted the opening and hot glued the sack to the head. You don't want any of those poly pellets escaping. I tied a jute rope bow around the outside just for cuteness. Give him some rosy pink cheeks and a flower on his hat and he's ready to just sit on your desk and smile back at you.
 This is a Pumpkin Roll, if I call it a pumpkin roll nobody in my house will eat it, so we call it a spice roll. My husband doesn't even want me to call it a pumpkin roll, he says pumpkin roll just doesn't sound good. You know all that mushy orange stuff you pull out of a pumpkin when your a kid and your going to carve them. But mix it with sugar, cinnamon and a cream cheese filling and you have fabulous. My daughter asked me what I was making and then she looked at me and said "I
  want to know what it is really called", teenagers are so funny, NOT.


