Tuesday, February 28, 2012
I can't stop making flowers!
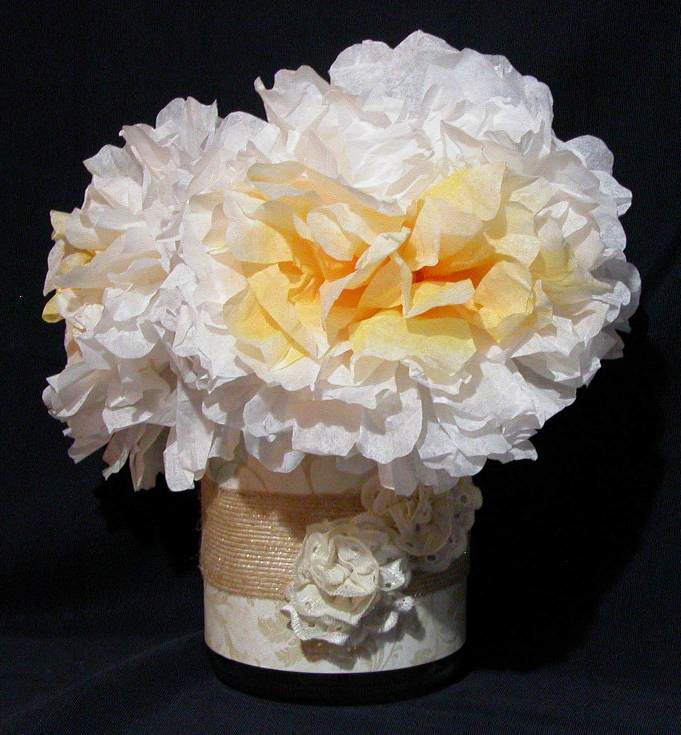
I saw these White Peony's on Pinterest and decided to give it the old Southern Gurl try. The tutorial I saw had yellow stamens but I used yellow food coloring with a dab of red in a small water bottle and just sprayed the center two coffee filters. On one of the flowers I sprayed the ends of the coffee filters on the other one I sprayed the center. I do like the one that had the center sprayed the best. I have made four of these and I will keep making them until I run out of coffee filters. The tutorial showed folding the coffee filter four times, I folded it three times and cut the ends into a ragged heart shape. I think I need to fill my craft room with these filters, what a lovely place it would be! Or maybe I will just have to go buy some more and make some for May Day. 

Sunday, February 26, 2012
Four Leaf Clover Boutonniere
 St. Patrick's Day, March 17th, the day of his death. St. Patrick is well known for teaching the Trinity by using a three leaf clover. For all of those who are Irish or just like to celebrate the day, here is a four leaf clover to wear. This could be made into a tree leaf clover by just cutting one of the leafs into a thick curved stem. I made this one in camo colored felt for the boys. The solid green one is cute but I didn't think the boys would like it. You could put a pin behind it and wear it like a boutonniere or hot glue it to a head band or hair clip. This will
  make you pinch proof!
 Saturday, February 25, 2012
My Texas T-Shirt
 It's Go Texan time and I needed a new Texas shirt, so I took a plain white t-shirt and sewed a Texas shape onto the front of it. I used a thin blue jean material and sewed about a 1/4 of an inch inside the shape, then I took scissors and clipped the outside of the shape. I pulled and rolled the edges to give it a frayed look. I saw this on a blog to cover up holes in T-shirts, but she sewed it from the back and then cut the t-shirt away on the front side. That was cute also and a great idea for those shirts that need to be patched.
Saturday, February 18, 2012
Outdoor Activity Guide | Life's Better Outside®
I feel the great outdoors calling me! For me it is still to cold to camp but I am already preparing for this years camping season. New tenny shoes for hiking...check, food list....check, map...working on that one. When you go on a trip this summer, pull out a map and show the kids how you're going to get to your location. Part of the fun is the preparation. Sit down as a family and make a packing list, a food list, there are plenty of places that offer family camping how to's, Bass Pro Shops and the State Parks. You don't want to take a class? It's not a class it's an adventure with your kids. Unplug your kids and become Explorers. Buy a hard plastic lined lunch kit and turn it into a first aid kit, have the kids research what should go in it. Check out the the guide below from Texas Parks & Wildlife.
Outdoor Activity Guide Life's Better Outside®
Outdoor Activity Guide Life's Better Outside®
Friday, February 17, 2012
Old Fashioned Fruit Cobbler
 I have been making this cobbler since I was young. We used to go blackberry picking and then make cobblers with them. My preferred cobbler is peach, I love peach cobbler. I came across a new recipe for cobbler that is more of a cake and it is good also but I think this one is my favorite. This calls for 2 sticks of butter but I think next time I will try it with just one, that's a lot of butter.
 Peach Cobbler
2 sticks of melted Parkay butter
2 cups of fruit

2 cups of flour
2 cups of sugar
2 cups of milk
2 teaspoons of baking powder
Pretty easy to remember isn't it?
Pre-heat the oven to 350 degrees.
Layer the fruit over the butter, I used canned peaches so I poured the juice out and sliced the peaches thin. Mix the flour, sugar, milk and baking powder and pour gently over the fruit so it doesn't move around. Bake for 60 minutes. I like to eat
 it warm, yum. You see how nice the top crust is? If I use only 1 cup of butter I am afraid it might change it too much, but it won't hurt to try it one time!
 Wednesday, February 15, 2012
Cowel Neck Scarf
 I went to the park to walk the other day and the cold wind just blew right through me, brrrrr. I was so cold I cut the walk short. I had a sweat shirt on but around my neck line I was frozen. So what did I do? I made a cowl neck scarf. It is made from fleece so its very soft and it covers my neck, I love it. I cut 1 piece of fleece 18" x 40" and sewed it together on the short sides (18"). So now it is a circle. I cut some fringe about 1/2" wide x 3" long, all the way around. Now I just need some cold wind to try it out. Wouldn't you know it, here in Texas one day it's 30 degrees the next day it's 70 degrees. I don't believe winter is over yet so I have a feeling it will still be used but I will be warm. Machine wash, hang to dry.
I Found My Sock
 I have been looking for my lost sock for a year now and I have finally found it. The not lost sock has been hanging around for a year knowing one day the other would appear. I made this cute sign to hang it on until the other one decided to show up. I printed Lost Socks and a sheet of scrapbook paper and used Modge Podge to adhere it to a piece of wood that had been stained. I did the same for the clothespins. I drew the lines around the sign with a black sharpie, hot glued he clothespins on and added bows for cuteness. Now it hangs empty:( Where was this when my kids were small?
Fleece Pillow
 I saw this video on how to make this cute pillow and it came with patterns. Go to theDIYdish.com Season 4 Episode 2. I'm not sure what type of material they used but I used polar fleece, soooo soft and the ends won't fray. I just cut the flower shapes and (2) pieces 18 x 18 square, sewed the square leaving an opening and stuffed it. Hand sewed it closed and sewed the flowers on using the same technique the ladies did on the video. This project took about an hour to create, cutting the flowers was the longest part. I think it will look lovely on my swing. Did I mention it's soft?
Sunday, February 5, 2012
Pirates Treasure Chest
 I love Hillshire Farms Smoked Ham, so I have a lot of these cute little containers. I use them for leftovers, lunch container and Pirate treasure boxes. I took some Fusion Hammered Finish spray paint and sprayed the outside of the containers. I took a 5" strip of 1/2 ribbon and hot glued it down the center of the back to create a hinge. Then I hot glued ribbon on for treasure chest straps. If I had a pirate stickers I would have placed them on there also. After I hot glued the ribbon down I realized I should have used grosgrain or faux leather for the straps.
  Think of the booty you could place in these baby's, chocolate coins, eye patches, and maybe a mustache, arrrrrrr.
Pony Bead Spirit Bracelet
 The Wranglerette Drill Team for Waller High School would have swaps before the games to get the girls excited for the games. This bracelet is made with elastic cord, pony beads, a bell and ribbon. I put some fray check on the knot to keep it from unraveling. Then I decided to make one for the 4th of July. These were fun and fast, great for small children.
Thursday, February 2, 2012
Hey Diddle Diddle
 Hey Diddle Diddle, the cat and the fiddle, the cow jumped over the moon. A nursery rhyme most children grow up hearing. Have you ever thought about what a child imagines when they hear a nursery rhyme like this one? Think about Humpty Dumpty, a giant talking egg....weird. A while back while the family was off at school and work, some cows had gotten on our property. It wasn't the first time and they would leave huge ruts that could swallow up one of my children. I'm looking at the cows and wondering how they got across and how I'm going to get them back over the fence. I guess I was wondering out loud because one of my kids stopped, looked up at me and told me, "Mom, if a cow can jump over the moon they can jump over a fence!". Well, what do you know, I was looking at it all wrong. Don't you just want to squeeze them? It brought a smile to my face and I will never forget it. Note to my daughters, I should have written this down in her scrapbook. Thanks Amy!
Wednesday, February 1, 2012
Boot Bling
 How do you make Cowboy boots sparkle and shine....a boot bracelet. These boots are just for decoration in my craft room but put that bracelet on a shiny new pair of black boots and we are talking serious bling. The silver bracelet is just a head band I bought at the store. I made the flowers by twisting a long strand of material and tacking it into a circular motion. The centers are buttons. I might just need a new pair of black boots!
My Old New Clock

I looked around my craft room and it doesn't inspire me, it is just a work space. But that is about to change! I have decided it can be cute and functional too. I started with my clock, it was black so I sprayed it white. Then I took some flat cardboard discs I had collected at the hardware store and tied  15" of tulle around it. They used these pieces of card board to separate the saw blades and they were just throwing them away, that's just wrong! I hot glued the clock to the tulle and I think it is just too cute! INSPIRATIONAL
 15" of tulle around it. They used these pieces of card board to separate the saw blades and they were just throwing them away, that's just wrong! I hot glued the clock to the tulle and I think it is just too cute! INSPIRATIONAL
Subscribe to:
Posts (Atom)